- Home
- Help
Quick links
Frequently Asked Questions
-
Can I add a link to Fotosizer.com on my website?
Of course. We're very happy for you to help promote Fotosizer.
We have created the following images:


-
Can Fotosizer be installed silently?
Use a /S (uppercase) parameter when you run the installer. This will use all the default options and not display any setup windows.
Options usually set in the installer UI can be set using command line parameters when using a silent install:
- /DESKTOP=1 - adds the Fotosizer desktop shortcut.
- /QUICKLAUNCH=1 - adds the Fotosizer quick launch bar shortcut.
- /AUTOCHECKFORUPDATES=1 - enables the automatic check for updates option.
- /SHELLEXT=1 - adds Fotosizer to the Windows Explorer right click context menu.
-
Can Fotosizer be installed to another folder using a command line parameter?
Use a /D (uppercase) parameter when you run the installer. It must be the last parameter used in the command line and must not contain any quotes, even if the path contains spaces. Only absolute paths are supported.
For example this will install silently and set the installation folder to C:\Program Files\Fotosizer:
fsSetup.exe /S /D=C:\Program Files\Fotosizer -
Is it possible to set the Fotosizer Professional product key silently using the installer?
Use a /PRODUCTKEY=[productkey] parameter when you run the installer.
For example: fsSetup.exe /S /PRODUCTKEY=BB17D1AF-2457-D1326DB4
(note: this is a fictitious product key for the example only) -
What Operating Systems are supported?
Fotosizer is supported on Windows XP/Vista/Windows 7, Windows 8 & 8.1, Windows 10 and Windows 11.
There are no Mac, Linux, iOS, Android or Chromebook versions. -
Do I need to be an Administrator to install Fotosizer?
Yes, to install Fotosizer, you must have Administrator rights to your PC. This is common to most software installations.
-
When upgrading to a new version of Fotosizer, do I need to uninstall the old version first?
No, you can install newer versions of Fotosizer over the top of the existing installed version, without having to uninstall first.
-
Do I need to be an Administrator to run Fotosizer?
No. You can run Fotosizer as a normal or restricted user. You will only need to run as an Administrator if you are accessing files/folders that are protected by security on your PC.
-
How do I change the filename from the default %F (copy)?
By default, the filename in the destination settings section is set to "Create copies" with a filename mask of "%F (copy)" you can change this to a custom filename mask by selecting "Custom" from the filename drop-down selection box, then choose the filename mask you wish as below.
-
What are the available Filename mask codes?
You can find the available list of Filename mask codes by clicking the Help button next to the Filename mask field.
Here is a list of supported codes:- %F - Original filename (without the file extension)
- %W - New width (in pixels)
- %H - New height (in pixels)
- %PW - Percentage width
- %PH - Percentage height
- %N - Consecutive number (index in list of images being resized)
Number of N's determines the number of digits:
%NN = 01, %NNN = 001 - %D - Current day (01 - 31)
- %M - Current month (01 - 12)
- %YY - Current year (2 digits)
- %YYYY - Current year (4 digits)
- %FD - Folder of the original image
- %FP - Folder path of the original image separated by "-" characters replacing "\"
- %OFP-N - Folder path of the original image separated by "\" characters
N is the number of folders to remove from the beginning of the folder path:
%OFP-2 would remove the first 2 folders from the folder path. - %T - Image count
- %exif.datetaken - Date taken
- %exif.datecreated - Date created
- %exif.datemodified - Date modified
- %exif.title - EXIF Title
- %exif.subject - EXIF Subject
- %exif.keywords - EXIF Keywords
- %exif.comments - EXIF Comments
- %exif.authors - EXIF Authors
- %exif.copyright - EXIF Copyright
- %exif.cameramake - EXIF Camera maker
- %exif.cameramodel - EXIF Camera model
- %exif.description - EXIF Description
- %exif.software - EXIF Software
- %exif.lensmake - EXIF Lens make
- %exif.lensmodel - EXIF Lens model
Using the %N filename mask you can choose the starting number using the "Start numbering at:" setting that is available when a filename mask of %N is used.
When using the %exif.datetaken, %exif.datecreated and %exif.datemodified, dates can be formatted using the teh varibale name followed by date format in [ ]. For example %exif.datetaken[yyyy-MM-dd HH_mm_ss].
-
How do I just batch change my photos to Black and white or just apply one of the other effects?
Choose the Percentage resize option, keeping the percentages at 100%. Then, tick the 'Black & White' box or the effect or your choice in the Effects section and click Start.
-
How do I just batch rename my photos without resizing?
Choose the Percentage resize option, keeping the percentages at 100%. Then, choose a filename mask in the destination setting, choose where to save the resized photos and click Start.
-
How do I resize portrait and landscape photos at the same time to a custom width and height?
You can resize photos of different orientation by using the "Reverse width and height by orientation".
For example if you want to resize 2 photos, one landscape and the other portrait with the settings width=800, height=600, the resulting landscape image will be resized to 800x600 and the portrait image will be resized to 600x800. -
What happens when I select the "Duplicate source image folders" setting?
The "Duplicate source image folders" setting tells Fotosizer to re-create the folder structure of your source images in the destination folder.
For example if you have the following:
Destination Folder: D:\My Documents\My Pictures
Source Image location: C:\Test pictures\large\boat_hiRes.jpg
The folder image will be resized and saved to the folder:
D:\My Document\My Pictures\Test pictures\large -
What happens when I click one of the "Buy Now" buttons?
When you click one of the "Buy Now" buttons above, you will be redirected to a 3rd party payment gateway FastSpring. You can complete your purchase through our page on their site, choosing quantity of licenses and enter your contact and payment details. We do not receive any of your credit card/payment details from FastSpring.
-
How will Fotosizer Professional be delivered to me when I buy it?
When you have completed your purchase of the Fotosizer Professional edition, you will receive your product license key on the completion page, along with a link to download Fotosizer. You will also receive a confirmation email with the same details and another email receipt of your purchase.
-
How do I activate my Fotosizer Professional license?
When you have completed your purchase of the Fotosizer Professional edition, you will receive your product license key on the completion page, along with a link to download Fotosizer. You will also receive a confirmation email with the same details and another email receipt of your purchase.
Here are the steps to activate your Fotosizer Professional license using your product key:
- Download the latest version of Fotosizer from our website at: Download now, clicking on the Download Now button.
- Once the installer is downloaded, run the installer to install Fotosizer.
- When the Fotosizer installer has finished, open Fotosizer.
- Upon start-up of Fotosizer, Fotosizer will still be in an unregistered state. You will be prompted to enter a product key.
- When prompted on start-up, enter your product key into the text entry box. Make sure you enter your product key correctly where "0" is a zero, as the number not the letter O.
- Click the "Activate" button.
- You should then see a message telling you that the activation was successful.
- The Professional features will be added into your Fotosizer.
-
What is meant by "lifetime license"?
When you buy any of the variations of Fotosizer Professional, you receive a "lifetime license". This means that you will be eligible to receive any updates or future new versions completely free without needing to buy the product again.
-
Will my Fotosizer Professional license still be valid if I upgrade my computer?
If you upgrade your computer or buy a new computer, simply uninstall Fotosizer Professional and then use the Re-activation form here to request a re-activation so we can reset your license, then you can activate Fotosizer Professional again.
Request Re-Activation -
When I resize my photos, is there a way to keep the information stored by the camera such as date taken, camera model?
Yes, version 1.30 and above of Fotosizer now contains options to enable saving of information about the camera used to take the photo such as camera model, date taken, etc.
The "Copy EXIF information (JPEG)" should be checked by default but if not, simply go into the Miscellaneous settings section.
-
When I resize my photos, is there a way to remove the information stored by the camera such as date taken, camera model, GPS information?
Yes, simply go to the "Miscellaneous settings section and untick the "Copy EXIF information (JPEG)" setting.
-
Is it possible to keep the original created, modified or date taken dates when I resize my photos?
Yes, in the Miscellaneous settings section Fotosizer now has date settings:
Copy EXIF Date Taken (JPEG)
Keep original file Creation date
Keep original file Modified date -
Can I crop my photos using Fotosizer?
Yes, Fotosizer now has a "Crop" Resize mode. You just select the cropped size you want, the position of where to apply the crop in your photos.
-
Where has the "Center image in target resolution" resize setting gone?
The "Center image in target resolution" setting has now been replaced by the "Pad" resize mode. This now also allows you to choose if the position rather than always being centered.
-
What does the "Auto white balance" setting do in the Colour Adjustment section?
Unlike the human eye, digital cameras can't automatically adjust to compensate for variations in the colour of light, potentially causing unnaturally coloured pictures.
Using the Auto White balance setting, pictures can be adjusted to correct white balance and make the picture more naturally coloured.
-
Where has the "Auto Rotate" setting in the Professional Edition gone?
The "Auto Rotate" setting has been moved into the Options dialog. It now also enables thumbnails in the Image selection list to be automatically rotated based on camera EXIF metadata.
-
Can I resize my images by choosing a file size?
No, Fotosizer does not have the ability to resize by choosing a file size but using the Fotosizer Preview changes window, you can see the final file size of your images after your chosen resize settings and other processing settings have been applied.
-
Where can I find the EULA (End User License Agreement) for the Fotosizer Standard Edition?
Below is the link to the EULA for the Fotosizer Standard Edition (Free):
-
Where can I find the EULA (End User License Agreement) for the Fotosizer Professional Edition?
Below is the link to the EULA for the Fotosizer Professional Edition:
-
Can the Fotosizer Standard Edition (Free) be used in a business/corporate workplace?
Yes, the Fotosizer Standard Edition is free for both personal and commercial/corporate use. The Fotosizer Standard Edition will only be limited by it's features, but you can install it on as many computers as you wish.
-
Can you provide an explanation of the resize modes?
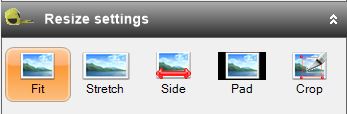
- Fit: Resizes and fits the picture into the chosen width and height, maintaining the original aspect ratio. The width and height will be adjusted if required to maintain the original ratio.
- Stretch: Resizes the picture to the chosen width and height, stretching if width and height make it so. This mode does not maintain aspect ratio. This is more of a "free" resize, allowing you to resize to any width and height and not care about maintaining aspect ratio.
- Side: The Side resize mode allows resizing of one side of the picture only. The other side will be automatically adjusted to maintain the original aspect ratio. This is particularly useful when resizing a mix of portrait and landscape pictures. You can choose to resize the longest side and it will keep the same orientation and resize to you desired size.
- Pad: This resize mode allows you to freely choose a width and height for your pictures, without requiring aspect ratio to be maintained. The pictures will be resized to fit inside the chosen dimensions, with the remaining space being "padded" with a background colour. You can choose the position inside the boxed area your picture will be positioned.
- Crop: This resize mode allows you "crop" a section of your picture, at a chosen position inside your picture.
- Fit: Resizes and fits the picture into the chosen width and height, maintaining the original aspect ratio. The width and height will be adjusted if required to maintain the original ratio.
-
Can I move my Fotosizer settings profiles to another computer?
Yes, Fotosizer saves your profiles to your User profile AppData folder. If you would like to move these to another computer or to another users profile on the same computer, just copy the file below to the same folder for the user on the other computer.
- In Windows Explorer, you can find the Fotosizer profiles file by entering this into the address bar:
%USERPROFILE%\AppData\Roaming
- The file is named "FSProfiles.dat", copy it to the %USERPROFILE%\AppData\Roaming folder on the other computer.
- In Windows Explorer, you can find the Fotosizer profiles file by entering this into the address bar:
-
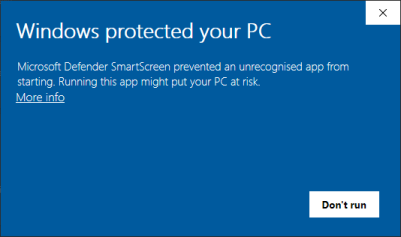
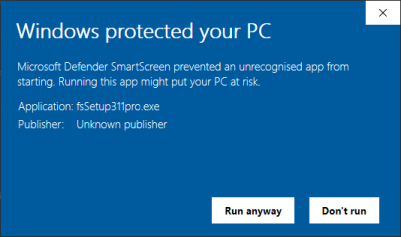
When downloading a new Fotosizer release, I see a Windows Defender SmartScreen warning. Is it safe to download?
Yes, the Fotosizer installer is completely safe to download.
If a file you are about to download is known by SmartScreen to be downloaded by a reasonably large number of people and considered to be safe, it lets you download it without any warnings. If a file has not been downloaded much by others or, a small number of people downloaded it, then it warns that it might not be a safe thing to do.
When new Fotosizer releases are first available, not many people have yet downloaded that new release, so this is why the warning is displayed. The more people download, the reputation of the Fotosizer release grows, and then after time, you will no longer see the warning.
To allow the download, simply follow these steps below:
- Click the "more info" link on the SmartScreen warning dialog
- Click the "Run anyway" button to allow the download
-
When I launch Fotosizer the application window is hidden and can't be made visible. How can I make the Fotosizer window visible?
It's possible that the Fotosizer window is positioned off the screen, possibly from using dual monitors. It can be easily made visible again on your screen by following these steps:
- Open the Windows Task Manager by right-click on the Windows task bar and select Task Manager from the menu, or by holding down Ctrl+Alt+Delete then select the Task Manager option.
- If not already visible, click the More details option at the bottom left of the Task Manager window to show more details.
- In the list of processes, find Fotosizer.
- Click the arrow icon to the left of the Fotosizer process to expand it.
- Right-click the expanded Fotosizer item under the main Fotosizer process.
- Select Maximize from the pop-up menu. This should show Fotosizer in a maximized state.
- You can now resize the Fotosizer window to your desired size. Close Fotosizer, then we open it again. It should now display correctly.
-
Can I resize and convert my images in HEIC file format with Fotosizer?
Unfortunately, Fotosizer does not currently support resizing of HEIC images. We do aim to add this feature but do not have a time line for this yet. In the meantime, you may wish to use our recommendation of a 3rd party application to convert the HEIC images to JPEG and then use Fotosizer:
- Go to https://www.copytrans.net/copytransheic/.
- Click the Download button.
- Run the installer and during the setup, choose the "I am installing CopyTrans HEIC for home use" option.
- Once installed, go to your folder containing the HEIC files, then select them, right-click on the selection and choose the "Convert to JPEG with CopyTrans" option.
- You will see that the images are converted to JPEG and saved to the same folder.
- You can then open these converted JPEG images into Fotosizer.
-
When I try to resize my images, it fails with errors of "A generic error occurred in GDI+", how can I fix this?
We have had reports of the AVG Anti-virus software and also the Avast Free Anti-virus blocking when saving images with Fotosizer which lead to this error. This can easily be fixed by following the below steps to add Fotosizer to the "Allowed apps" list in AVG Anti-virus:
- Open AVG Anti-virus or Avast Free Anti-virus.
- Click the Menu.
- Click the Settings option.
- With the General tab selected, click the Blocked & Allowed apps option.
- Under the List of allowed apps section heading, click the ALLOW APP button.
- Wait for the list of apps to be displayed, then scroll to Fotosizer in the list of apps.
- Click the Add app button next to Fotosizer in the list.
- In the Add allowed app popup dialog, select all features that are listed and click the ADD button.
- You should now see Fotosizer listed under the list of allowed apps.
- Click the Close link at the top of the settings dialog.
- Try resizing in Fotosizer again. This time it should all be successful.
-
When I try to use Webp images in Fotosizer or resize other images to WebP it fails with the error "The type initializer for 'Fotosizer.Imaging.Format.NativeMethods' threw an exception", how can I fix this?
Fotosizer depends upon a file "libwebp.dll" that is installed into either the x64 or x86 folder inside the Fotosizer installation folder. This file requires the Microsoft file msvcr120.dll from the "Visual C++ Redistributable Package for Visual Studio 2013" to be installed on the computer.
The error you are seeing suggests that either the file is not in the correct folder or the msvcr120.dll is not installed.
Checking for the libwebp.dll file:
- Please look inside the installation folder for Fotosizer. This is usually C:\Program Files\Fotosizer or C:\Program Files (x86)\Fotosizer.
- If your Windows computer is 64 bit, there should be an x64 folder in the Fotosizer installation folder and it should contain the libwebp.dll file.
- If your Windows computer is 32 bit, there should be an x86 folder in the Fotosizer installation folder and it should contain the libwebp.dll file.
- If you don't find the file, our suggestion is that you try re-installing Fotosizer. You should just be able to re-run the Fotosizer installer without needing to uninstall first, then it will just replace any missing files.
WebP support in Fotosizer requires the Microsoft file msvcr120.dll from the "Visual C++ Redistributable Package for Visual Studio 2013" to be installed on the computer in the C:\Windows\System32 folder.
In most cases this will already be installed, but if this is not installed, please follow in steps below:
- Download and install the "Visual C++ Redistributable Package for Visual Studio 2013" from the link below:
https://support.microsoft.com/en-gb/topic/update-for-visual-c-2013-redistributable-package-d8ccd6a5-4e26-c290-517b-8da6cfdf4f10 - Click the download link for your language and version of windows, x64 for 64-bit or x86 for 32-bit. Once downloaded, run the installer. When the installer has finished you will be asked to restart your computer.
- After restarting, please try again with your WebP images in Fotosizer.
-
What is the difference between the Text watermark settings "Reduce font size to fit" and "Scale font size proportional to image"?
The "Reduce font size to fit" setting will reduce the font size to fit the text watermark within the image, but will not increase the font size if the text is smaller than the image.
The "Scale font size proportional to image" setting will scale the font size to fit the image. For example:
- If the font size is smaller than the percentage proportion of the image, it will be enlarged to fit.
- If the font size is larger than the percentage proportion of the image, it will be reduced to fit.
-
When I try to resize my photos saving to the original folder I get an access denied error. How can I fix this?
Fotosizer is likely being blocked from saving to protected folders like Pictures, Documents, etc. due to Controlled Folder Access on Windows, a security feature that prevents unauthorized or malicious applications from modifying files in sensitive locations.
Why is this happening?
This can happen after we have released new versions. The way the Microsoft security works is based upon trust and reputation. In the case of new Fotosizer releases, in the first few weeks after release, they are still gaining reputation from people downloading and using Fotosizer.
How to fix it?
- Open Windows Security by clicking the Start button, then selecting Settings > Update & Security > Windows Security > Virus & threat protection.
- Under the "Ransomware protection" section, click on "Manage ransomware protection".
- Under the "Controlled folder access" section, click on "Allow an app through Controlled folder access".
- Click the "Add an allowed app" button, then select "Browse all apps" or "Recently blocked apps".
- In the file dialog, navigate to the Fotosizer installation folder, usually located at C:\Program Files\Fotosizer or C:\Program Files (x86)\Fotosizer.
- Select the "Fotosizer.exe" file and click the "Open" button.
- Fotosizer should now be added to the list of allowed apps.
- Close Windows Security.
- Try resizing your photos again saving to the original folder. It should now work without any access denied errors.
